Event
Welcome to the SuitCentury Events FAQ section! Here, we cover common inquiries related to special events, such as weddings, proms, and formal occasions. Discover answers to questions about outfit recommendations, group orders, customization options, and delivery timelines. We're here to help you make your event memorable with our extensive collection of mens suits, suits, and tuxedos. If you have any specific event-related queries, our customer support team is ready to assist you.Jump to a question
Creating Event
- Click "Suit a Group" button from top of the page.
- Click "Get Started! 🎉" button. Its always easy with creating an account on Suitcentury.
- Fill the personal and event informations required.
- Click "Create Group" button.
- Your Event Group is created! Please verify your phone number.
Updating Event Information
-
Click marked area in the picture;
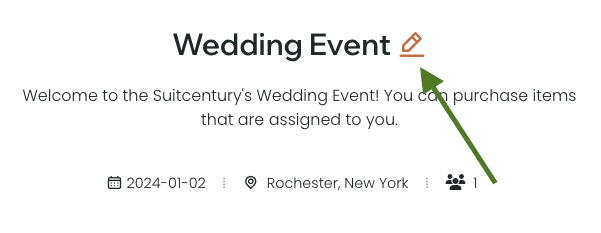
- Fill the informations for your need then click save button.
- Your Event Group is updated!
Returning to Your Event
If you are unregistered, to return your event copy the url from the provided area. Click to the link to copy it to the clipboard.

If you forgot the event URL completely, please see "View Events" section on Account F.A.Q
Adding - Updating Participants
To add a participant;
-
Click "Add Participant" button marked area in the picture;
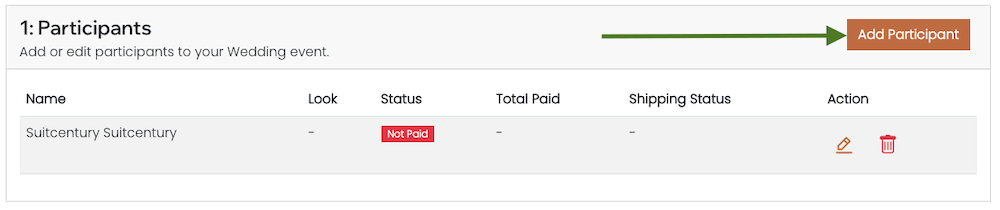
- Fill the informations required then click "Add Participant" button.
- Participant is added!
To edit the participant;
-
Click the button marked area in the picture. Please choose the participant to edit.
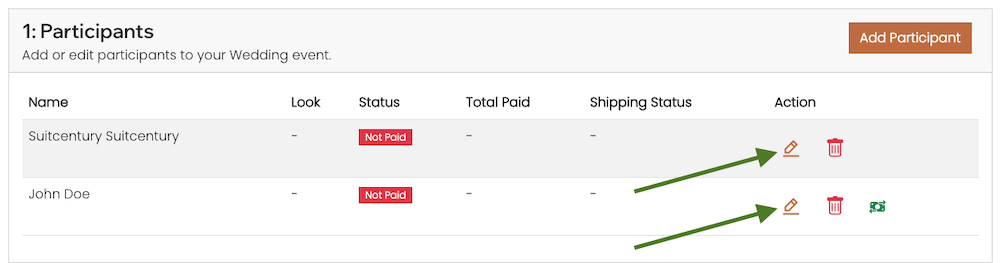
- Fill the informations you want to change then click "Update Participant" button.
- Participant is updated!
Delete Participant
To delete a participant;
-
Click button marked area in the picture;
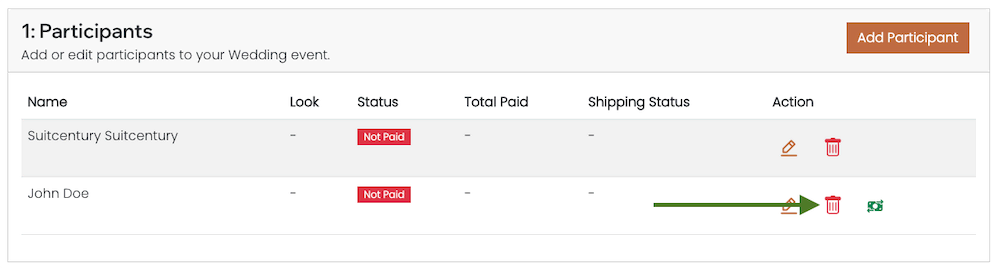
- Click "Yes, delete it!" to delete participant.
- Participant is deleted!
Adding a Look
To add a look;
-
Click "Add Look" button marked area in the picture;
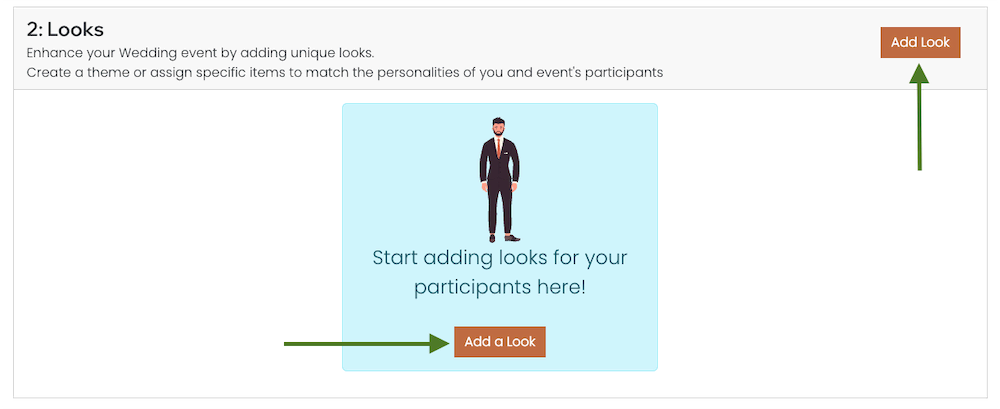
- Enter Look name.
-
(Optional) Choose Role for look.
If you want to make this selectable based on the participant's role, please choose accordingly. If you select 'everyone,' all participants will have the option to choose unless you assign them a specific look. If you select 'Just Assignee,' just the assignees can purchase this look. - Click "Add Look" button.
- Look is added!
Adding Products to the Look
To add a product to the look;
-
Click on the designated button area in the picture.
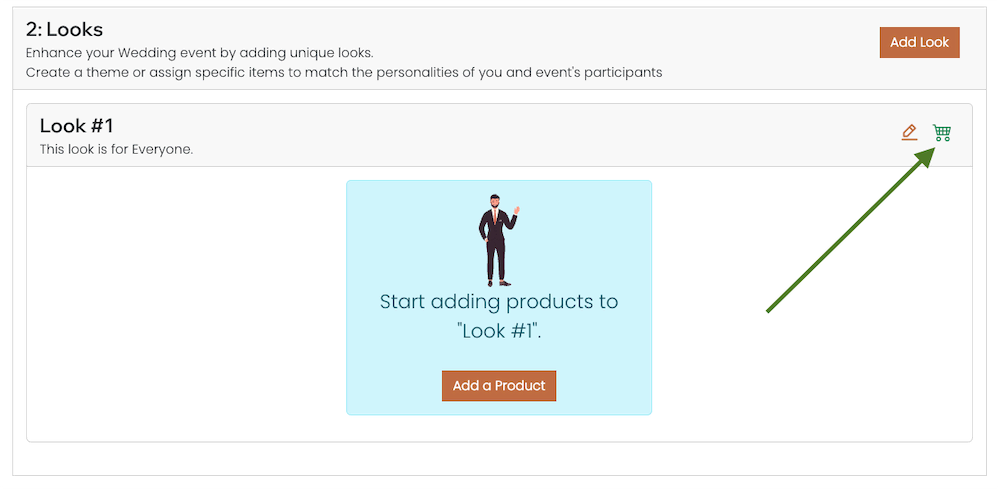
-
A new window will open. Click on the '+' icon on the button to add it to the look.
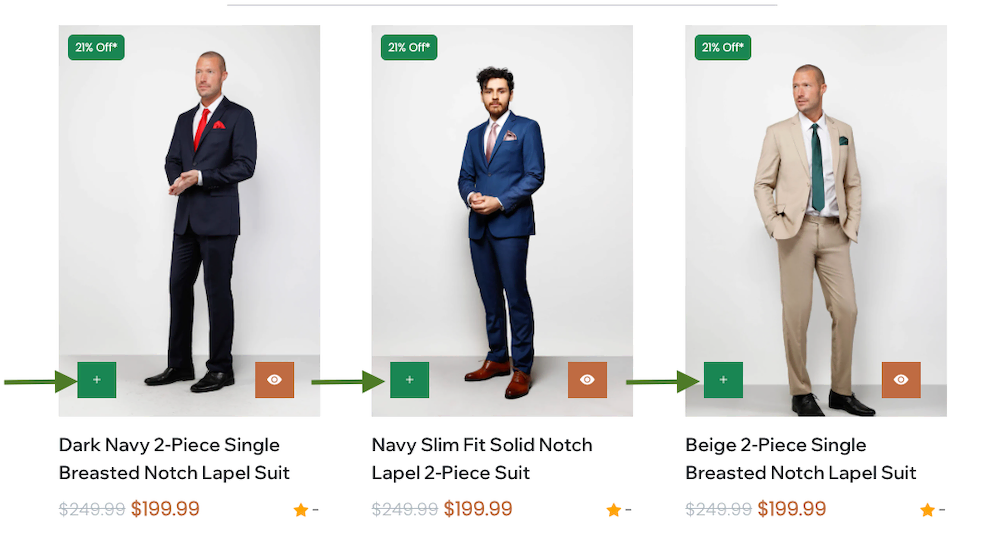
- Close the opened window.
- The look has been updated with the product.
Assign a Look to the Participant
To assign a look to participant;
- Scroll to the participants section.
- Please follow the steps outlined in the "Adding - Updating Participants" section.
- Assign a look to the participant by selecting it from the dropdown/select box.
- The look has been successfully assigned to the participant.
Sending Invitations
To send invitations participants;
-
Scroll down to the "Send Invitations!" section and click on the button displayed below

-
Inspect for any warnings. You have the option to send invitations individually by clicking the respective icons next to each participant.
Alternatively, you can choose to send them using the email service provided by Suitcentury.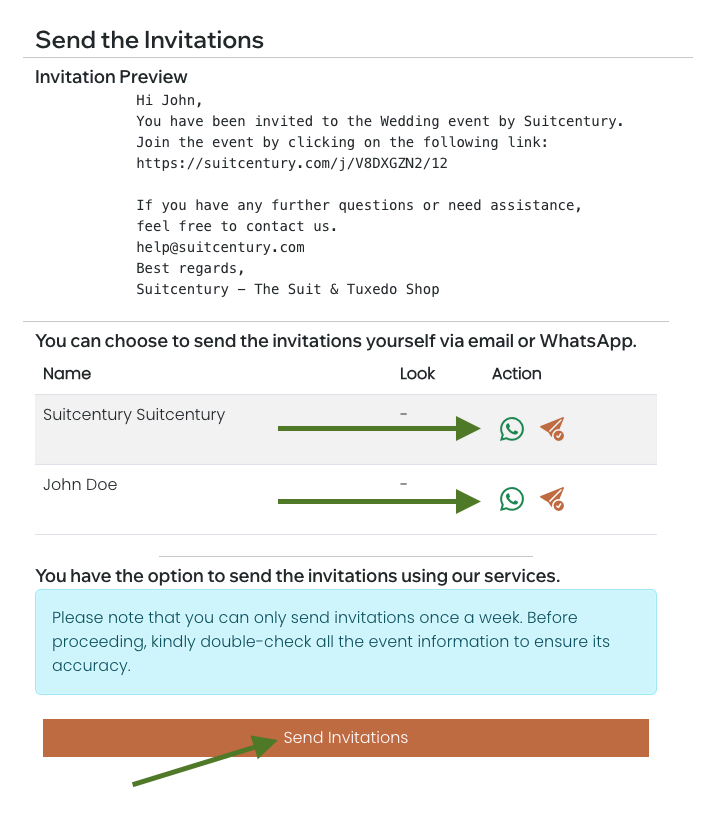
- Done! You have successfully sent invitations to the participants.
Paying for your items
To purchase your items;
-
Scroll down to the "Send Invitations!" section and click on the button displayed below

-
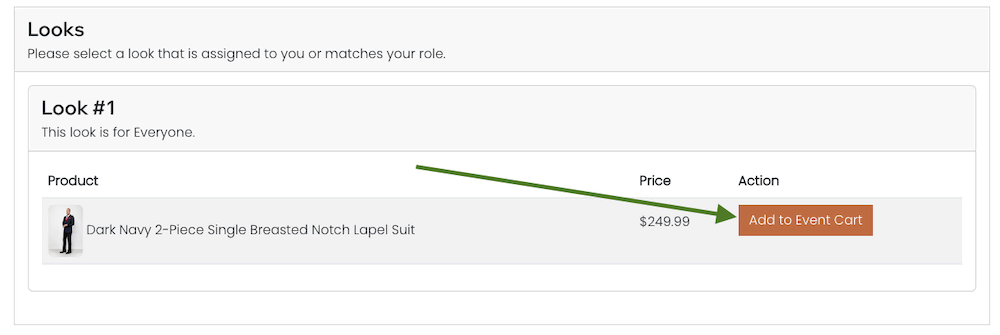
A new window will open. Scroll to the indicated area and click on the "Add to Event Cart" button.
-
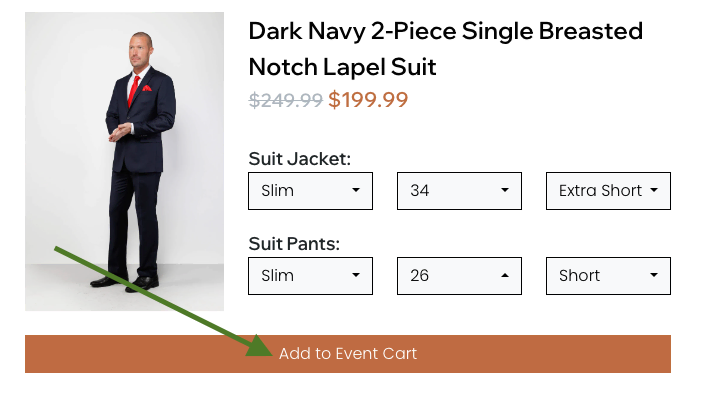
Select your sizes from the designated area and click the "Add to Event Cart" button to add your products to your event cart.
- Please refer to "Fast Checkout" and "Regular Checkout" sections for payments.
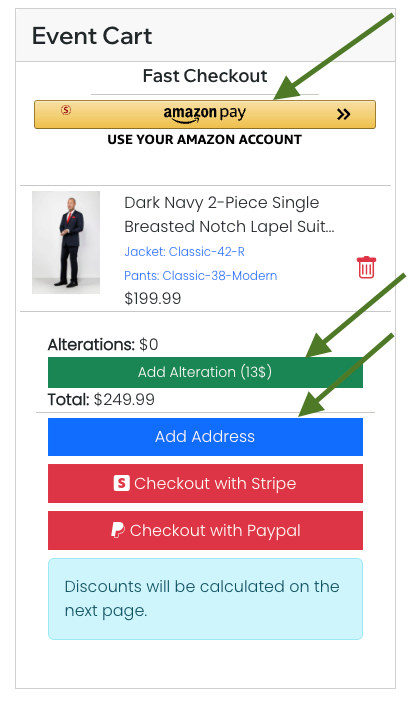
Fast Checkout
To expedite the checkout process, please review your cart and make any necessary alterations (e.g., pant leg alterations).
-
Click the "Amazon Pay" button located in the "Fast Checkout" section.
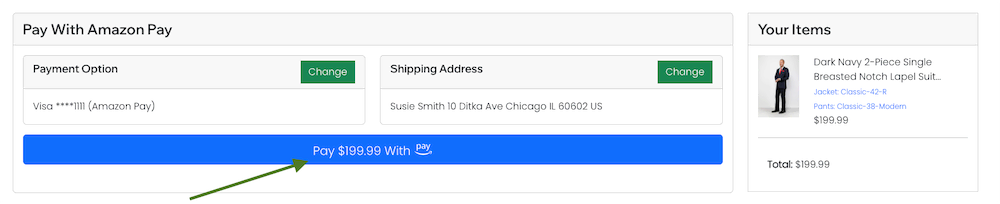
- After clicking the button in the opened window, please log in to your Amazon account and proceed to checkout."
- Select your preferred payment method and address, which will be fetched from Amazon Pay.
-
After ensuring that everything is set, click on the button displayed below to complete your checkout with Amazon Pay.
-
You will receive a message regarding the status of your order.
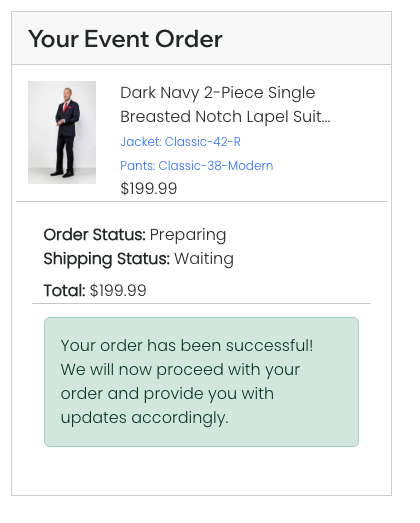
Regular Checkout
To expedite the checkout process, please review your cart and make any necessary alterations (e.g., pant leg alterations).
-
Please provide your shipping and billing address..
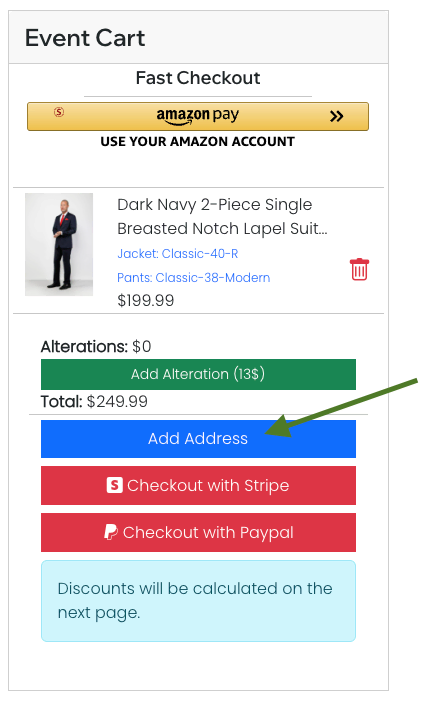
-
After adding your shipping address, please select your preferred payment method. You can choose to pay with Stripe or PayPal
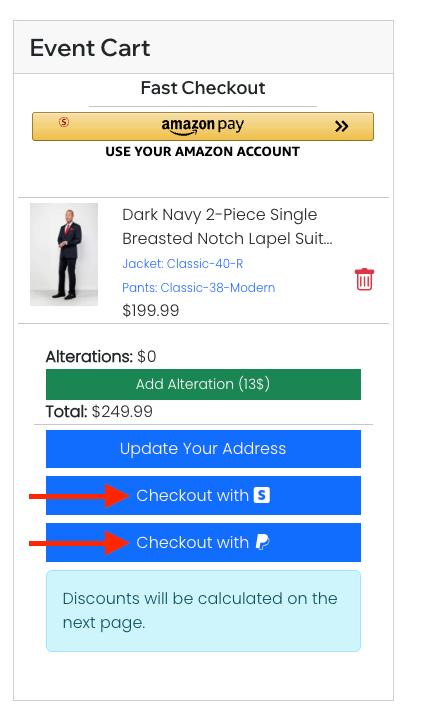
- Proceed to complete the payment through the selected payment provider
-
Done!
How to use coupon code on event?
To use your coupon code:
- While creating an event, enter your coupon code in the promotion area. The coupon will be added to your event.
- After creating the event, navigate to the event settings area at the top of the page and enter your coupon code in the promotion area.
- Done! You have successfully applied the coupon to your event.
Didn't find what you're looking for?
Contact Us